

This quilt was inspired by my favorite place, the beach! You may be wondering why I would add gray to a beach inspired quilt.. I live in Northern CA where we often have gray overcast beach days, and I still find them lovely! In fact I love gray and blue together.
This is the first quilt that I've made for myself (not including holiday quilts)
It was really hard to make something that was for ME, something that I would want to keep out ALL THE TIME (Holiday quilts get put away eventually!). I really enjoyed creating this block. I basically just made it up as I went along (yes I am one of those quilters!) and it somehow all came together really nicely. Below is my tutorial for my block. Enjoy, and if you make your own quilt with this block I would LOVE to see it!
Cheers!

*Please read through all instructions carefully before beginning, This is not an easy block

3 white
3 polka dot
3 solid

All 8 will be white

4, 4 1/4 inch by 4 1/4 inch square
2 polka dot2 solid

All 4 will be white
2, 1 1/2 inch by 12 1/2 inch strips
2, 1 1/2 inch by 15 inch strips
(sorry no picture of these!)

Four pieces of paper that are 3 1/8 inch by 3 1/8 inch (my paper has also been marked where I will sew with my 1/4 inch seam, that is the line I drew on all my papers. It is NOT the line you sew on, I marked it so I could see where my 1/4 inch sewing foot needed to hit, this was the easiest way for me, if you prefer to mark the actual line you will be sewing on, please draw a line down the center)
Take your 2 solid 6 1/2 by 6 1/2 inch squares and use a fabric pen to make 1/4 inch from the center (you may want to draw a line down the center first and then measure 1/4 inch on BOTH sides from that line, or if you're like me you can just measure 1/4 inch with the ruler by placing in on the center line)

You should have two lines, Running 1/4 inch away from center line

Pin the solid squares right side together with your polka dot square right side together

Sew on BOTH the 1/4 inch lines

Take your ruler, measure the center and cut

You will have two pieces that look like this

Repeat this process with another solid and polka dot so that you have the 4 center squares for your quilt block (don't use all 3 solids and dots, Just 2 each for this center)

I don't know why this picture is so washed out, but here they are. Ta-da!

Lay them out like a pin-wheel so you know what they will look like when you sew them together

Get your papers handy

Lay the 3 1/8 inch by 3 1/8 inch fabric on top of your squares. We will be paper piecing the white center together

Lay your paper on top of your blocks, making sure the blocks are still laid out the correct way (you don't want to sew this on incorrectly) and pin, And if you're like me and you have a 1/4 inch seam drawn, make sure the papers are laying the correct way. If you draw a line down the center, also make sure your papers are going to open the correct way)
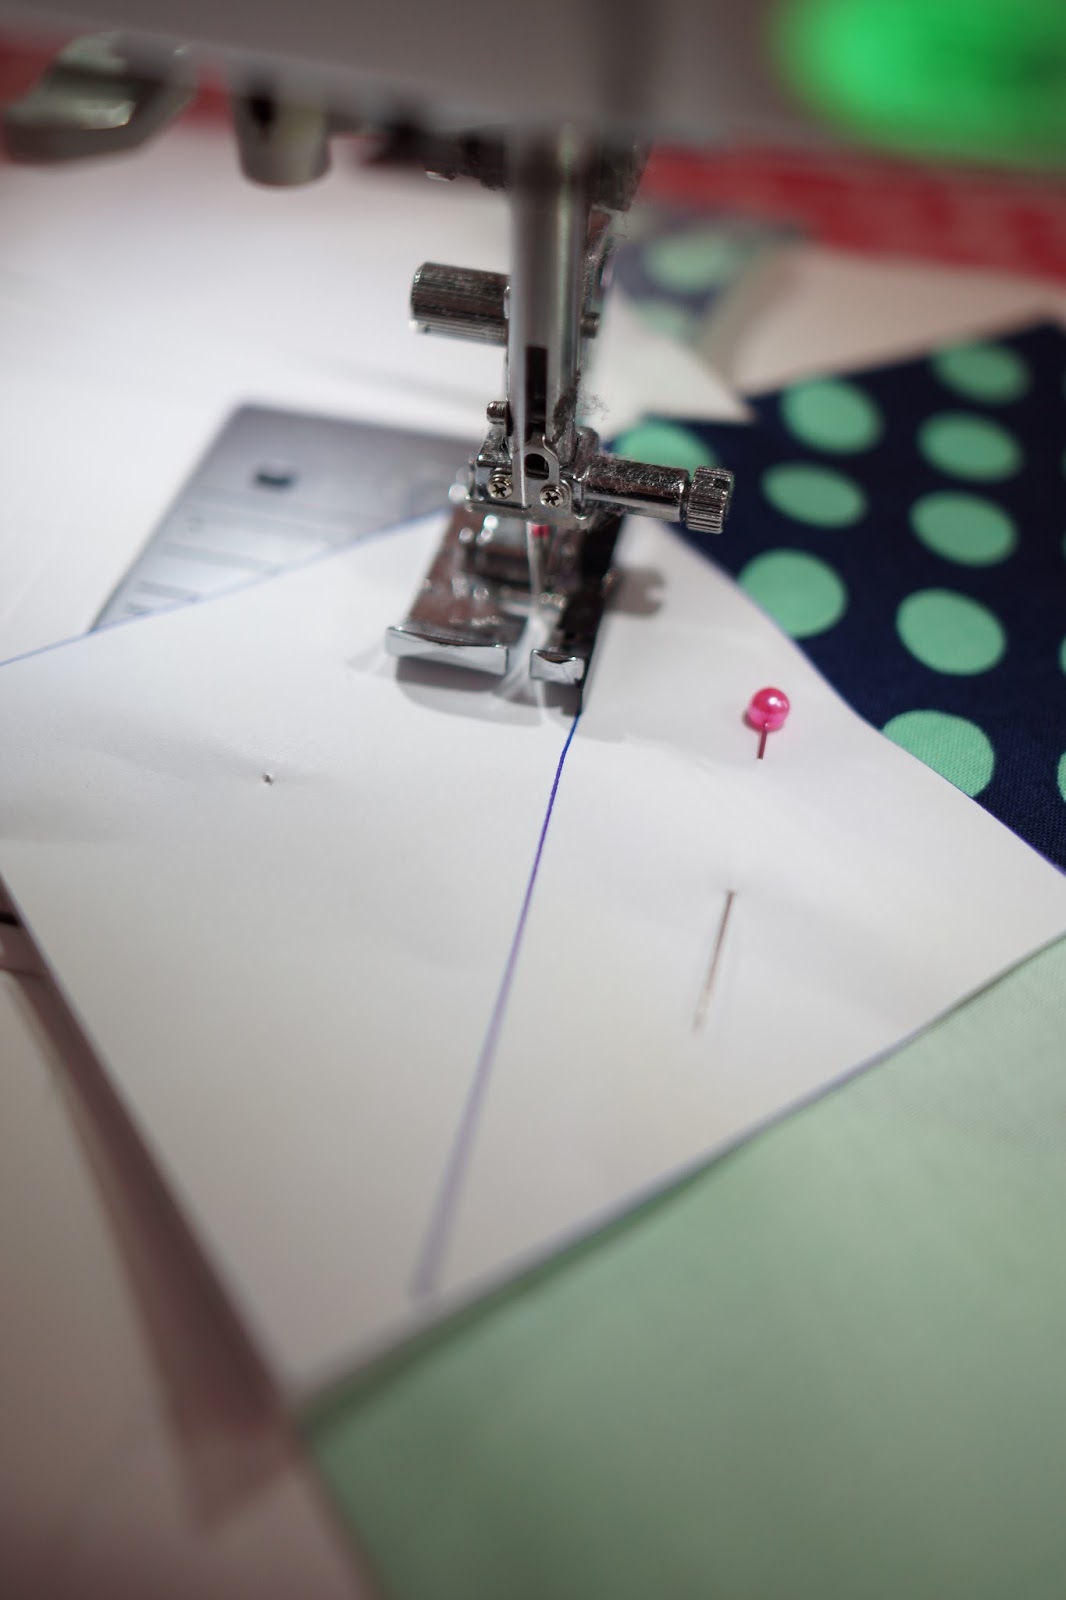
Sew with your 1/4 inch seam
***I used my line to show where my 1/4 foot would hit, I didn't sew on my 1/4 inch line, I sewed down the center of the paper
.
I LOVE the sound of paper piecing, even though I know it is dulling my needle, it's like music to my ears!
Do this with all four blocks
***I used my line to show where my 1/4 foot would hit, I didn't sew on my 1/4 inch line, I sewed down the center of the paper
.
I LOVE the sound of paper piecing, even though I know it is dulling my needle, it's like music to my ears!
Do this with all four blocks

Press to seal and set the seam, then rip the paper off (another sound I enjoy!)

Cut off your excess fabric (make sure you're cutting off the right fabric, I have cut the wrong way a few times! Not fun)
Sew your block together
Matching up your seams
Matching up your seams

Press everything and you have the center square
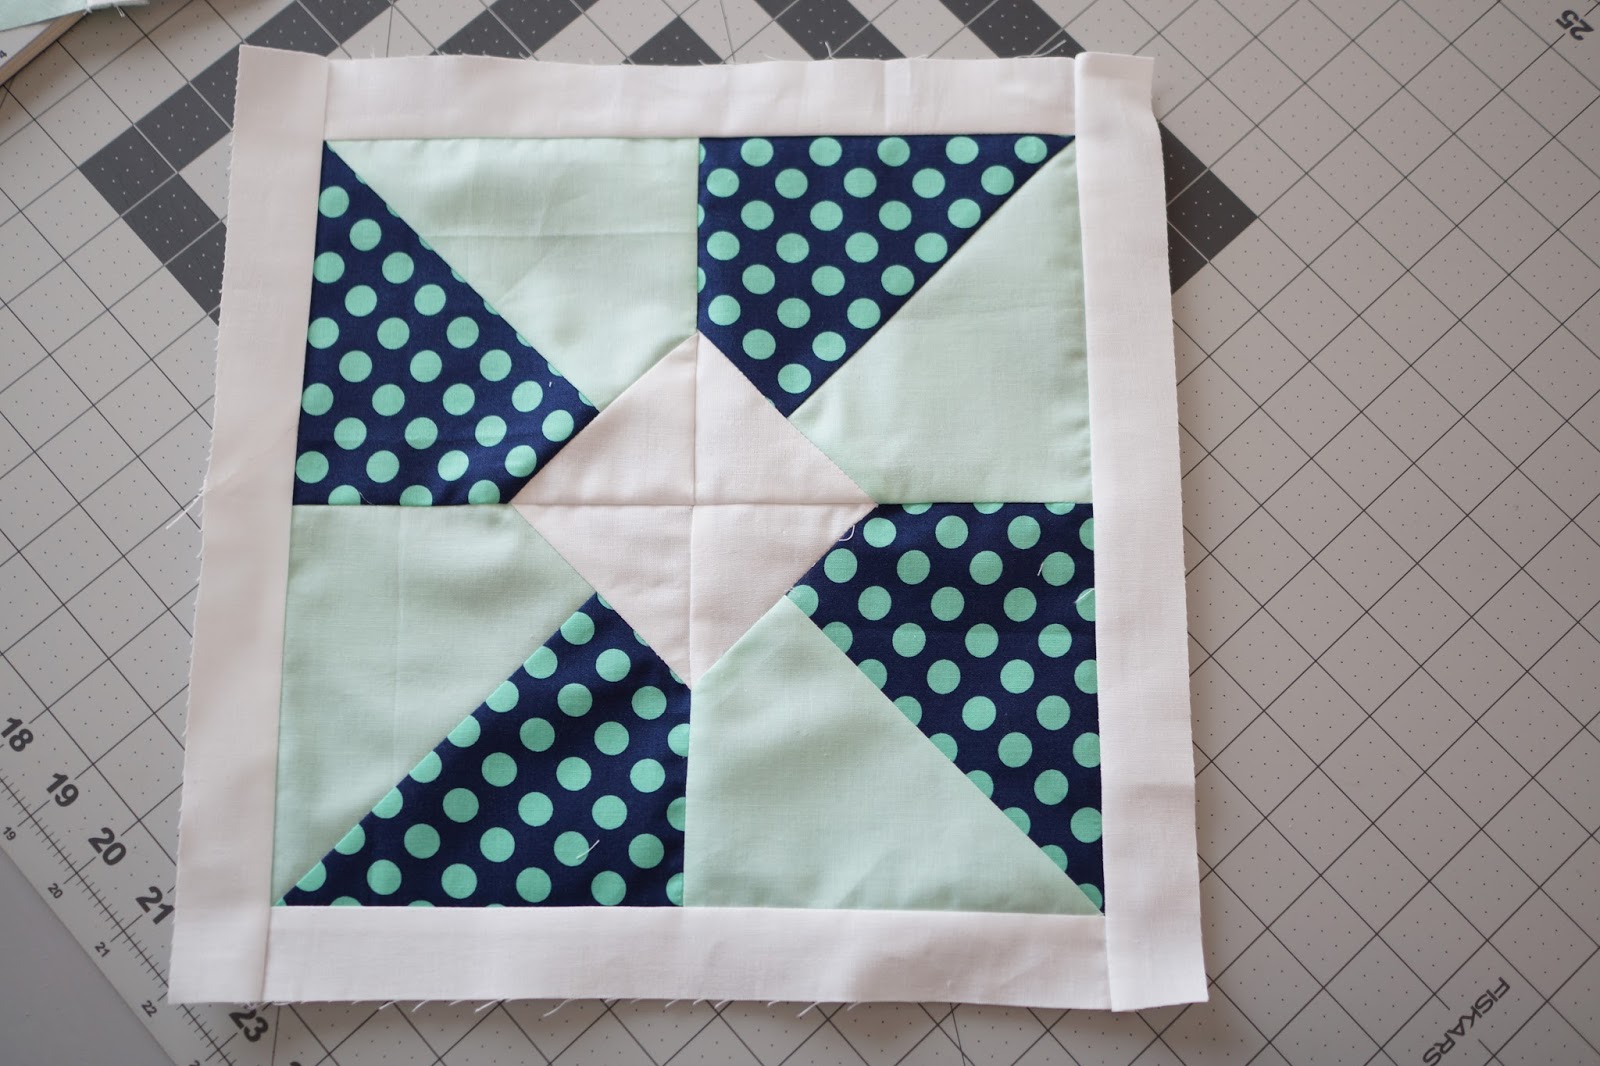
I added a 1 1/2 inch border around, just to mix it up a bit, plus I love how things look when outlined in white!
This is would be two strips that are 1 1/2 inches by 12 1/2 inches
Then two strips that are 1 1/2 inches by 15 inches
Next we make the outer squares

Take your remaining 6 1/2 inch by 6 1/2 inch squares, 1 polka dot and 1 solid, lay them right sides together (you can pin them if you need, or just make sure they don't move). cut into 4 equal parts

Do this with two white 6 1/2 inch by 6 1/2 inch blocks as well
Sew each piece of solid and polka dot together with a white triangle to make a square with one side colored fabric and one side white fabric. Next you need to sew two squares together to make a half triangle (make sure you sew them so that they will be opposite of your center block, meaning, don't sew them so the polka dots are going to be right above the polka dots on your center square, it's best to lay them out to make sure they will be right before sewing)

Sew the half triangles together
Making sure to match up your seams (I love it when seams match up so nicely!)

I then sewed the white 4 1/4 inch by 3 3/4 inch blocks on to each triangle piece, then I added my four 4 1/4 inch by 4 1/4 inch blocks onto the end of two to complete the square
Make sure to press all your seams! I haven't been saying that, but don't forget to!

Alright so here are the last four pieces
Attach the two smaller strips first, making sure to line up the seams

Then add the final two
And... You have one quilt block done!

These blocks took quite some time (maybe because I was making this up as I went along!) they were about an hour each for me! And I am a pretty quick sew... This is the most complicated thing I've done, so I hope the instructions make some sort of sense!
Let's just admire the finished quilt, which did eventually get finished after hours of labor!

As you can see, I ended up using 9 of my blocks for the quilt


I put a pretty mint on the back and did the binding in navy

And, finally, I just like how quilts look when they're folded up nicely

Sharp!
ReplyDeleteKaHolly, Thank you!
ReplyDelete