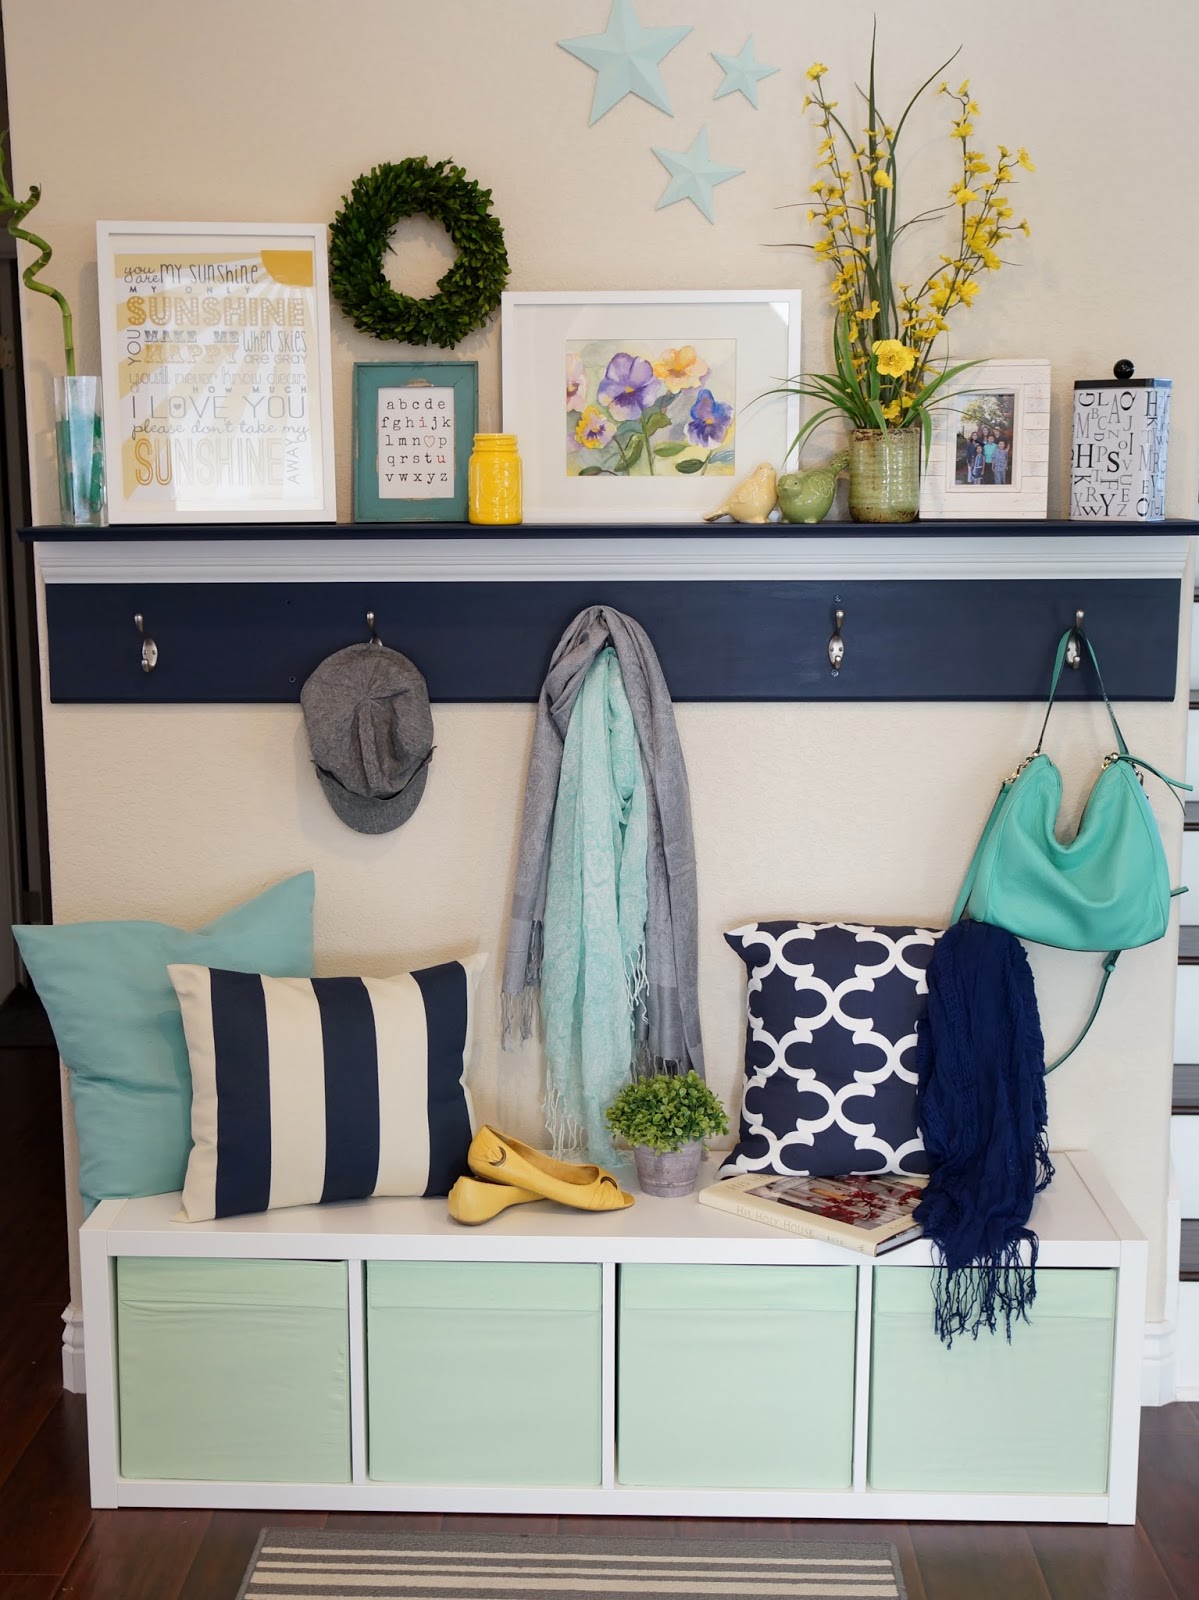
I needed a shelf. Not just any shelf, but a large shelf to fit a very specific area. I don't know if you're like me, but I can NEVER EVER EVER find what I'm looking for. Maybe I am too picky, or maybe I just envision things in my mind that don't exist. Whatever the problem is, it's not a problem I enjoy having! After trying to figure out what to do with this space, my sister convinced me to just BUILD a shelf. Build a shelf???? I don't own a saw, I can barely hammer nails in straight, and aside from Ikea furniture, I've never built anything out of wood in my life. Luckily I'm adventurous (or crazy) and I decided to go for it.
Here are my very crude instructions that will most likely not make sense to anyone because I REALLY did not know what I was doing!
1- I measured my space and decided how long I wanted my shelf. 66 inches. I also decided that I wanted the shelf to have a ledge, and 5 hooks.
2- I went to Home Depot, and wandered around like a lost child until I found the wood area. I chose the wood I wanted. One 5 1/2 inch wide pine for the ledge. One 9 1/2 inch pine for the... Oh great I don't even know what to call this, uh.. the part of the wood where the hooks will go! Then three pieces of molding. Molding is optional depending on the look you're going for. I put one on the edge of my ledge, one underneath the ledge, and one along the bottom of the shelf.
Then I had the worker at Home Depot cut the wood at 66 inches. That's why I didn't need a saw for this project!! Yeah!!
Here's my pine. I don't know which wood is best for projects... I just went with the cheapest...
3- I took my newly cut wood home, and used wood glue to secure the ledge to the other piece of wood (wow such great instructions). Then I used finishing screws to make it super secure. Yes finishing screws, I had no idea what these were until I went to the hardware store and had this conversation:
Worker- Can I help you find something?
Me (girl who doesn't know what she is doing)- Ya I am looking for screws for a shelf
Worker (walks down an isle)- I have these screws
Me- Do you have them in a dark color?
Worker (walks down other end of isle)- Sure, here are some black ones
Me- Will these go down into the wood so I can putty over them and not have them stick out?
Worker- Uh, I think you're looking for finishing screws
Me- YES! Those exist?
Worker- They sure do, there's also sliced pickles now too!!
And that's how I came to know what finishing screws were!
Look at that nice screw in there! All ready to be puttied over, sanded, and painted!
Oh and in case you're wondering, I didn't have a table for all this wood working so I was using an old desk with an old blanket over it. I wouldn't recommend this as a work station, but I'm crazy and just worked with what I had
Make sure that your ledge is level before you glue it and screw it in. Otherwise all your decor might slide off
4- Next step was to attach the molding. For this I used little baby nails, and to get them in deep enough to cover, a nail set (thank you hardware guy again!!). I glued the molding down. Hammered in a few nails to make it secure and then used the nail set to get the nails as flat with the wood as I could.
5- After the shelf was put together I puttied over all my nails, waited for it to dry, then sanded everything down in preparation for painting.
6- Paint the shelf! I went with a dark navy blue. I wanted something that would stand out against my light colored walls. I also decided to paint my decorative molding white, to make it stand out and add character. (that hook is not attached, I just wanted to see how it would all look together)
7- Hang the shelf.
8- Attach the hooks, and touch up any paint that might have gotten scratched during you clumsy shelf making
And now, oh goodness, you have a shelf!! I added an ikea shelf below for extra storage since this is going to be a drop zone for backpacks, jackets, books, shoes, etc.
I decided to spend the morning decorating my new shelf super cute, since I know it will never look like this again...
I went a little shelf crazy, pulling decorations from all over the house. My yellow shoes are never going to be sitting out so perfectly along with my scarves... But it's fun to pretend for a little while!
Now if I can ever find some red or coral baskets that fit into my ikea shelf below, I can actually decorate the shelf the way it will always look. Why is it so hard to find baskets that fit into ikea shelves! Why can't ikea just make the basket color that I need?
If anyone has ever found fabric baskets that work for this shelf, please let me know!!
And if you need further instructions with the shelf, don't hesitate to ask! Maybe one day I will learn all the terminology and actually buy a saw!


.JPG)
.JPG)
.JPG)
.JPG)
.JPG)
.JPG)


No comments:
Post a Comment